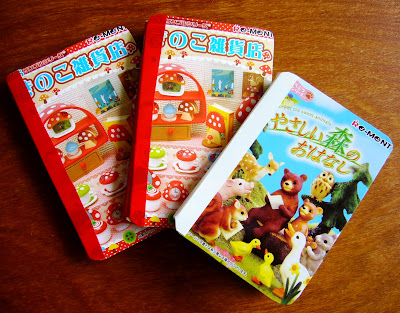
It must be fairly obvious that I LOVE re-ment (those kawaii tiny Japanese miniatures) and I have to admit that I have a lot of them. But I also have a lot of leftover boxes, and they are just too just darn cute to just throw away. SOOOOO, besides cutting them up to make stickers, I thought they'd make excellent book covers, and I've put together a little tutorial that utilizes and recycles these boxes and leftover paper and makes something really cute for not a lot of $$$. You can basically use any thin, non corrugated cardboard box (like a shoe box or a cereal box) but re-ment boxes are awesome because they are so nicely designed. You can also use any old paper you have lying around (like from a used school book, or scratch paper...). Although my tutorial is kinda simple, there are also really awesome, high-tech and professional tutorials on book binding on the Instructables website. But, since you are already here, and without further ado, here my tutorial for a recycled tiny re-ment booklet:

Materials: Hopefully you can find most of this stuff in your house; the only thing I had to buy was the electrical tape (which is awesome because you can place it again and again and it comes in pretty colors).
- cardboard cut to size (I used the front and back panels of the re-ment boxes, so that limited the size of my books)
- paper (recycled from school notebooks: graph paper is awesome because the lines help guide you... I would highly recommend a paper cutter if you have one... so easy!)
- dental floss
- upholstery, tapestry or yarn needle (basically a big honkin' needle; I think I actually used an embroidery needle)
- scissors
- electrical tape (it comes in many sizes, get one that is at least 3/8" or ~2 cm; you could probably use masking tape as well, though I don't know how easy that will be or how good it will look)
- awl (I've read that a compass or heavy needle will also work, but the awl made it so easy)
- First, cut your paper. To get the right size, use the piece of cardboard you are going to use as the cover as a guide; just double the width of the cardboard piece and cut out your papers approximately to that size (you will be folding these papers down the middle to form the pages of your book). However, you will want to make sure it the paper is smaller than the cardboard you want to use by at most 1/4" or ~ 10 mm. This will ensure that once you bind your book, its paper won't be sticking out way past the cover. Organize the paper into little booklets ( I forget the proper term) of approximately 7-10 pieces (folded in half, it will give you 14-20 pages). You can make as many of these booklets as you want, though I think a good number to stay between is 3-7.
- Use an awl to punch holes in your booklets, maintaining the same number and placement of holes in each booklet. In the end, you'll want them to line up with each other so that your papers are held neat and tidy.
- String a long length of dental floss onto the needle (I used my spread arms as a guide) and use a ladder stitch to sew the pages together. (So, you sew down one side of the book which leaves every other stitch empty or without thread. Once you get to the bottom, you just sew back up the way you cam, which fills the empty stitches with floss... hopefully the picture helps!)
- Knot it at the end and repeat for all remaining booklets.
- Once that is done, it's time for binding! Mind you, mine is waaaay unprofessional, but hopefully easy! Get a short length of electrical tape and place it around all of your booklets... the neater you are here the better! Try to keep the tape and booklets straight... it helps to put the booklets on a flat surface so they stay even while you are binding them.
- To ensure the booklets don't fall out individually, open the book to the place where each booklet ends and begins, and place another length of tape down the middle of the two booklets, joining them together. Do this for all the booklets. Again, neatness is key!
- This is what it should look like when you are finished with that part:
- Place the covers on your now bound booklets and use the tape to bind the two covers and the booklet book together. Make sense? No? Maybe the picture will help. Don't forget to be tidy!
- Also, don't forget to bind the booklets to the cover on the inside with more tape at the joining of the cover and booklet!
- Ta-Da! Your little booklet should be done; it should be flexible and no pages or booklets should fall out.... ever. Now you can use it for fun! (hint; I rounded the corners so it looks more professional... Yay!)


Awesome idea! I can totally see making these for my neice! The cereal boxes could be super fun!
ReplyDeleteFantastic, easy-to-follow toot! Can't wait to give it a go.
ReplyDeleteVery cute project!
ReplyDeleteThese are very cute! Thanks for the tutorial I'm going to have to try this one out.
ReplyDeletetres mignon!
ReplyDeletemerci mon amie!!