Thursday, July 31, 2008

Delicious lunch

I am notorious for not being able to cook. Not even a little bit. My scandalously short reportoire of things I am able to cook well includes : watercress soup (sounds impressive, but really you just open up a can of chicken stock and throw the watercress in there with a bit of ham), scrambled eggs, and rice in a rice pot. The one time I made cookies from scratch years ago, I didn't know very much about baking (which sadly hasn't changed that much) and we ran out of salt. Being the genius that I am, I said "Aha! I will use Hawaiian salt (rock salt) and it will be just as good!" Well, in case you don't know (I sure didn't), rock salt will not dissolve in the cookie batter, even if you mix it like crazy. When you bit into that batch of cookies, you got a lovely taste of chocolate, cookie, and SALT. It was a dismal failure, much to the glee of my pro baking family.


Well, today, I actually added something to my recipe list; saimin! Okay okay, I didn't really cook it; I more like found some noodles in the freezer, threw them in the pot, and used leftover ingredients to make it mo' `ono (more delicious!).

For people who aren't familiar, saimin is what we call ramen here in Hawai`i, and you only use the package stuff if you are truly, truly desperate because frozen noodles taste much better and have waaaay less fat and sodium than the dried package ones. I made it real Hawaiian style with a bit of hard-boiled egg (yum), green onion (yum), spam (see, I told you it was Hawaiian style) and a pat of butter. I've never tried the butter or egg thing before, but I see them as "extras" you can buy for you saimin on menus so I figured I would try them on my own for free! Not bad, not bad; the egg was good but I think I'll skip the butter next time to make it healthier and probably just as tasty. Actually, I'm not sure how healthy this lunch was because I also had a red cream soda from the local soda company Diamond Head Soda (you can see the little Hawaiian Islands logo on the can!). So, maybe not that healthy but very good! Prerequisites for eating saimin: chopsticks and newspaper placemat for all the slurping!

Monday, July 28, 2008

technology is grand


Here is the external hard-drive I got for my birthday, it's so cute! I've been storing all of my etsy pictures and files (lots and lots) on many jumpdrives but no more... they are all going on this baby. The drive came in this lovely yellow color, but the hamster is a window cling sticker that I had lying around. Besides looking quite pretty, this drive can hold up to 130,000 pictures, Yay!


The good thing about having sisters is that you can share... we decided to split the cost of a bamboo fun, which is a tablet and pen that hooks up to your computer and allows you to draw much easier than you could with a mouse. IT IS THE BEST THING EVER! The bamboo came with adobe photoshop elements (which we didn't have before) and corel paint, and it is so awesome I can't even describe it. It's really making my fabric designing so easy it's almost ridiculous! Combined with the new laser printer my uncle got (which he said I could use when we visit, which is actually quite often) I can print out my own designs for buttons. I can also do banners and all sorts of things... the little bee in the upper left hand corner of my blog was drawn by me!


Wednesday, July 23, 2008

Clutches


Hey, thanks for your comments guys; I love reading them! Yeah, my shop is slowly filling up with all the pouches I sewed a few months back... seriously, that is the turn around time for listing for me, (especially sewn things). So, I've actually been sitting on around 50 sewn pouches, mini clutches and clutches, without actually listing them. Actually, they haven't even been photographed! I've held off because I don't know if its actually a good thing to list everything you have all at once (especially during summer... slow!) and I didn't want berrysprite to become a pouch shop; I like having a nice balance. >__<


But then that leaves me with 50 things clogging up my already jammed up shelves! Maybe I just need more previews...


So here we go; here is a preview of all the clutches I currently have made; they are a seriously cute batch. Unfortunately (well, fortunately for me) the blue dotted mushroom one in the upper left corner and the magenta and turquoise sakura one in the second row have already gone to a fantastic home. The good news is I can recreate any that have been sold so far; I still have more fabric of every clutch I've ever sold, so just let me know and give me a little time to make it custom (the buttons may be slightly different).


If anyone sees anything they are interested in just email me; it's back up after being accidentally deleted when I was contemplating redesigning my blog page!

Monday, July 21, 2008

moofia and tokidoki

So its a good thing I got so many good things for my birthday, because I'm trying to curb my spending! This little milk is from the moofia line of toys from tokidoki, which is basically a brand of cute designs made into toys, bags, accessories and clothing. Although the designs look really Japanese (and have themselves inspired other designers, like Gwen Stefani's Harajuku Lovers line) they are actually designed by an Italian guy!
I had already had one milk toy (the blue latte one) that I bought from urban outfitters a few years back for $2 on clearance (ahhh, those were the days... I believe now they are around $8). But when I bought it, it didn't have a box, so I had no idea that the boxes were themselves so cute! It's a blind box, which means you don't know which design is inside... I scored and got the strawberry milk one! Next on my wish list are these little cactus pups, which are also soo cute!

Thursday, July 17, 2008

Spoonflower baby!

Yes!!!! I have been invited to join spoonflower, which is this really awesome website for designing your own fabric. Actually, I got the invite last week (just in time for the celebrations) and since then I have been dreaming and dreaming of what kind of fabric I would like. Actually, I think everyone who signed up with their email got invited... I'm still stoked! It's rather expensive, and since its in beta you can only participate if you get an invite but I think it will totally be worth it! If you think about it, a lot of sellers on etsy sell fat quarters of Japanese fabric for around $4-6 a fat quarter; spoonflower fabric comes out to about that much, but you design it yourself!


Here is what I've been working on; my preliminary sketches. I haven't had a chance to do them digitally yet... I'm still working through my sale and custom orders. But, I think my fabric will reflect the berrysprite aesthetic; I will want to feature a lot of animals that I actually make on my fabric (see, there's pandas, and lions, and cats, and bears, and birds, and also fruits and vegetables!). Also, I'll want to keep the designs kinda small because I use fabric to make small bags and clutches. Oh the possibilities! I'm very excited for another idea for fabric (my original tooth/dental paradise concept was shot down by both my sisters-too scary they said...?) which will be.... weather! I'll show you how it turns out when I actually get around to doing it.


Now that I'm actually blogging about it, I can't remember who designed this fabric... shoot! I think it may be Alexander Henry, but I'm actually too lazy (and also all the lights are out) to check right now. Anyway, I think these fabrics are good inspiration, just look at all the colors! I think we are seeing more of the American designers making fabrics that look kawaii, asian and even Hawaiian inspired. It makes for a bigger body of fabrics to choose from!

Friday, July 11, 2008

100th post tutorial!

Yay, its my 100th post! To celebrate, I'm putting up a tutorial on a cute flower pincushion; there are a bunch of awesome tutorials on bottlecap/walnut pincushions, but I wanted mine to be a little snazzier, so I made it into a flower! I also added a magnet so that my pincushion could stick where I wanted it to (but on the computerized sewing machine!). They literally take 5 minutes, and would make awesome gifts or party crafts. Plus, you upcylce the bottle caps, and you use up any scrap fabric or felt you might have. Anyway, here is my flower version of the bottlecap pincushion!


You will need:

  • felt pieces
  • a fabric scrap (approximately 3.25" by 3.25", or 8.25 cm by 8.25 cm)
  • a bottlecap (I used a cap that measured 1.25" or 2.5 cm in diameter; mine came from a soda bottle)
  • a small ball of polyfil
  • needle and thread
  • scissors (ruler and pen are optional)
  • glue gun
  • small magnet


Step 1: Make yourself a template for the petals. Mine were approximately 2" or 5 cm tall. The template can be out of paper or felt, but you want to make sure all your petals are the same size.


Step 2. Cut your felt into 5 petals (or more or less, depending on how many petals you want your flower to have). Sometimes it helps to accordion or roll fold the felt and cut all the petals at once, fixing them individually afterwards.


Step 3: Once you have your petals ready, you can cut your fabric! Cut out a circle with a 3-3.25" diameter (approx 7.5 cm). To make it easier, you can use a fabric marker to mark where you're going to cut. It doesn't have to perfect.


Step 4: Hand sew all the way around the circle leaving a 1/4" (5 mm) from the edge. Pull tight on the needle and thread (gather) so that a little cup appears. Make sure the printed part of the fabric is on the outside of the cup (as in bottom picture).


Step 5: Fill the cup with as much polyfil as you can and knot the thread as tightly as you can... try to leave as small a hole for the polyfil to escape from as possible. Sometimes it helps if you go over your stitches again (while they're pulled tight) just to reinforce the sewing.

Step 6: Now you are ready to assemble your flower. Warm up your glue gun!
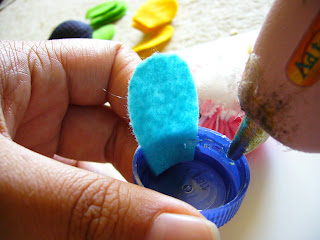
Step 7: Glue the petals into the inner part of the bottlecap, spacing them as evenly as possible. Remember, quite a bit of the bottom part of the petal will not show as it will be covered by the fabric pom button you made. I know, my glue gun is gross; but it works!


Step 8: Once the petals are glued in, place a large amount of glue in the bottom of the bottlecap and put the magnet in it... be careful, the bottom of the bottlecap will be hot!


Step 9: Place a ring of glue (fairly thickly) around the upper edge of the inside of the bottlecap; you will be applying glue onto the petals but that's okay, it will be covered by the fabric pom button. Actually, the more glue here, the better.


Step 10: Place the fabric pom button into the bottlecap, carefully making sure none of the edges from the part you sewed up are sticking out. Push and hold the button down for a little bit; this will give the hot glue a chance to dry a little.

Step 11: Clean up the petals by trimming off any rough edges.

Step 12:Although this is optional, you can cut a strip of felt that matches the width and height of the outside of the bottlecap to for a stem; just use glue to secure it to the bottlecap, under the petals.


Step 12: Enjoy your new pincushion!

Related Posts Plugin for WordPress, Blogger...